The unsubscribe link is alpha and omega in an email campaign. In MarketingPlatform, there must be an unsubscribe link, in order for you to be able to save and send your campaign. It is your assurance that you only send to contacts who want to receive your material. By default, an unsubscribe link is always included, but if you make your own design, you must make sure to insert it yourself. Read more here about how to insert links in your email.
There are three options in relation to unsubscription:
- You can use our standard unsubscribe link – see here how.
- You can create your own unsubscribe link – see here how.
- You can create an unsubscribe form that you can, for example, have on your website.
We will go through the third option here: the unsubscribe form.
Create an unsubscribe form
In the menu to the left, at the very bottom of the page, you will find Form. From here you can click on either View or Create form. If you click on Create form, you can, on the next page, choose the type of form you want to create.
1. Select Contact List(s) and Setup
First name your form. Give it a meaningful name, so that you are never in doubt what form is about. It can for example be “Unsubscribe form for the website”. Then you need to choose to which contact list your contacts can unsubscribe from.
To the right, you choose which type of form you want to create. Here you choose “Unsubscribe form (website form)”.
When you scroll down the page, you should take a few decisions.
- Subscription Form Properties: Design “send” button on your form. Choose size and colour.
- Select Language: Choose which language your form should be in.
- Properties: Here you can choose whether your contacts should double-opt-out. That is, whether they should confirm their unsubscription, or it is enough that they fill out the form.
- Communication: Select whether you want to send the contact our standard Thank you email after unsubscription.
- Design and Branding: Choose a design for your unsubscribe form. You can also choose to style it when you insert the HTML on your website.
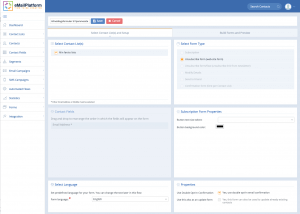 Create an Unsubscribe form (web-site form)
2. Build Forms og Preview
On the next page, you can customize the pages and emails that are part of the unsubscribe process. After a contact has clicked on “Unsubscribe” on the form, they will come through this order of pages (and emails):
- Confirm page: This is the page that you see after a contact has clicked on Unsubscribe. Here it is important to pay attention if the person has chosen to use double opt-out.
- Confirm email (on/off): This email is sent immediately to the contact if the contact has chosen to use double opt-out. Otherwise, the email is not sent.
- Thank you page: If one has chosen to use single opt out on his form, this page is seen right after unsubscribing. If you use double opt out, this page will be seen after the confirmation of unsubscription.
- Thank you email (on/off): If you have ticked this off on the previous page, an email will be sent with a confirmation that you have been unsubscribed.
For all emails and pages you can change the text and the design yourself, so that it matches your graphic expression. Save.
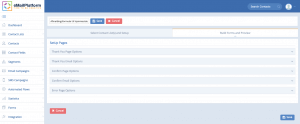 Design the pages and emails that are used in the unsubscribe process.
View forms and get HTML
After you have saved the form, you will be redirected to “View forms” where you have an overview of your forms. From here you can, at the far right, click on “get HTML” and then copy the HTML. Once inserted on your website, your unsubscriptions will automatically be registered on your contact list.