This article will guide you to set up a custom return-path in the Domain Checker area of MarketingPlatform. It will be helpful if you are already familiar with the terms SPF and DKIM in advance. You can read our article about SPF and DKIM here. To set up a custom return-path, it is required to have set up your SPF and DKIM with MarketingPlatform in advance. You can follow our step-by-step guide here to do just that.
A return-path is required if you want to be fully DMARC compliant, and setting a custom return-path on top of your existing SPF and DKIM will help to tie you delivery reputation to your domain, and as a good sender of emails, you will both build up and keep your good reputation to a greater extend with a custom return-path than without it. A return-path is also sometimes referred to as the bounce address or the MAIL FROM address.
How to add a custom return-path
When the return-path has been set up you will see a checkmark in your Domain Checker. In the image below you can see we have several domains, and the one where both SPF and DKIM are set up, we can create the return-path.
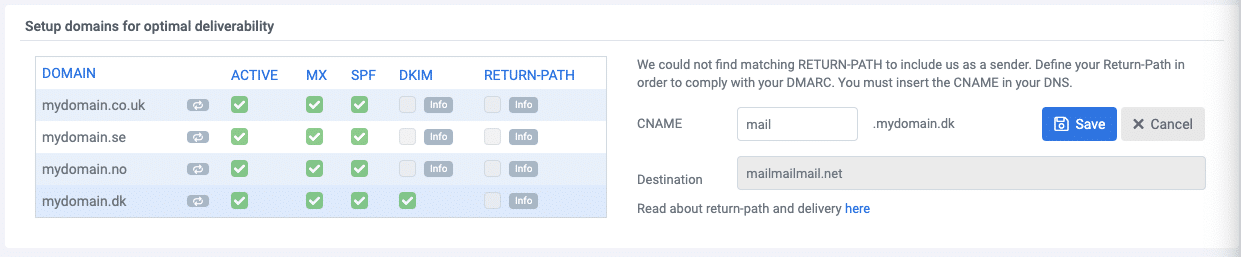
Clicking the info-icon on your domain without having set up a return-path yet, you will see a small setup panel.
- Simply edit and add the address and sub-domain you would like to use.
- Go into your DNS setup and create a new CNAME
- Add your domain as the name value e.g. mail.yourdomain.com and click the destination to copy our domain and paste it as the destination in your CNAME
Our domain checker will check your DNS and find your CNAME. Depending on your TTL it can take from a few minutes to hours before your DNS has been updated and we will be able to see it. If you set your TTL to 10minutes for a faster detection, remember to raise it again as a low TTL is often used by spammers and as it might not have any negative impact on your delivery, it certainly does not have a positive one either.
Once we have detected your CNAME and validated it – we automatically check, but you can manually hit reload as well – your custom return-path will now be used when sending emails for your domain. You can see your return-path by inspecting a sent email campaign. How to do this will depend on your inbox and will require a basic knowledge about email delivery to analyse. You will see something like this:
Return-Path: <return-info-johnsmith=gmail.com@email.yourdomain.com>
With the return-path being set up you can keep even more of your good reputation as a good sender and implement a DMARC policy.