How to set up SmartWeb Integration
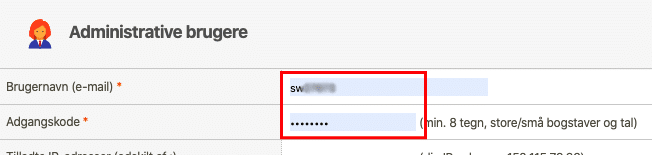
Before you begin setting up the integration with MarketingPlatform you should have created an API user in Smartweb. You will need to use this API username and password to set up the integration in MarketingPlatform.
In Smartweb, go to the Control Panel ->Administrative users -> Click “Create admin user account”, which you will find in the upper right-hand side. Then you should follow the steps to create an admin user account – if you need help doing so you can contact Smartweb support directly.
You need to use the following values when creating the Connector in MarketingPlatform:
The first step is to create a Connector. You find Connector under the “Integration” tab in the MarketingPlatform system. Next, you will need to do the following:
- Name your Connector.
- Select contact list.
- Choose Wannafind (and NOT SmartWeb) from the list of the systems on the right .
- Insert your Username and Password. An additional button called “+Add a second endpoint’’ will appear.
- Click on “+Add a second endpoint” button and the first field will be auto-filled with “Orders + Order items”.
- Next to this field, there are two additional fields. Just enter the words Username and Email here.
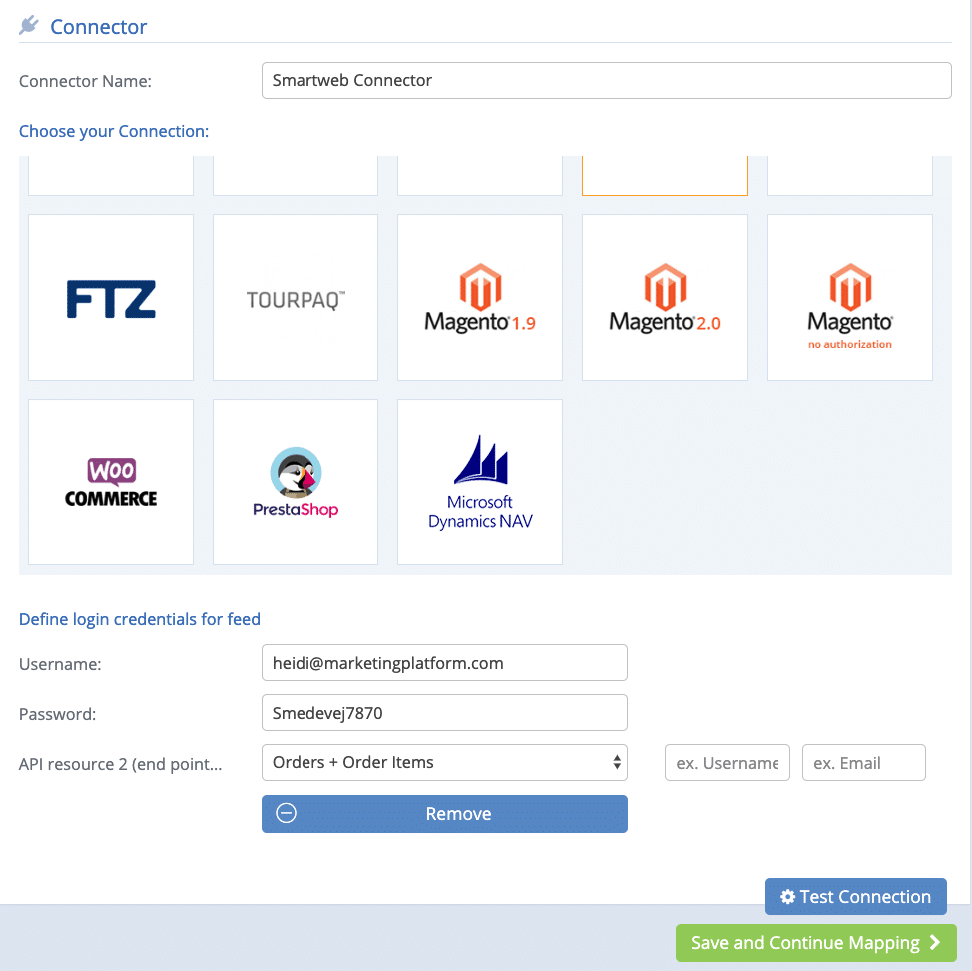
- Click “Test Connection” to see if the connection works.
- If this works as planned, click the “Save and Continue Mapping” button.
- Next, all fields must be merged together:
- The first field is always “email” or “mobile”.
- Then, if the field does not already exist in the contact list which you have previously selected, use “create field mapped with name and type from connected system”.
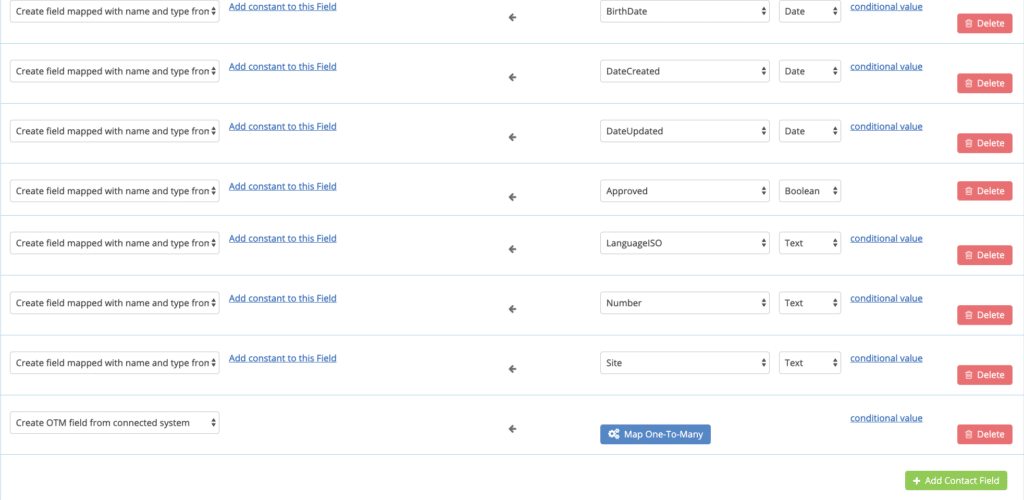
- For orders, unlike other fields, start on the left-hand side and select “Create OTM field from connected system”. As a result, the button “Map One to Many” appears on the left. Follow these steps:
- Click on the “Map One-To-Many” button. Then you must build the One-to-Many/order structure.
- Name it, for example, “Orders”
- Then drag “Orders” from the right to the left.
- It is important that you mark/click on ‘orders’ to activate it and to be able to build the rest of the structure.
- From “Orders” expand with the following fields: ID, CurrencyID, CustomerID, Status, Total, DateDelivered, TrackingCode, DateUpdated, DateSent, Origin, and orderLines. These fields should all be dragged from the right-hand side and into the order structure on the left.

-
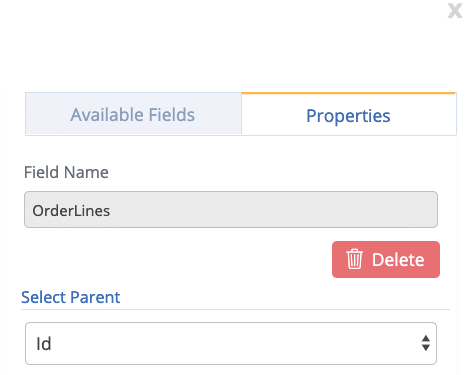
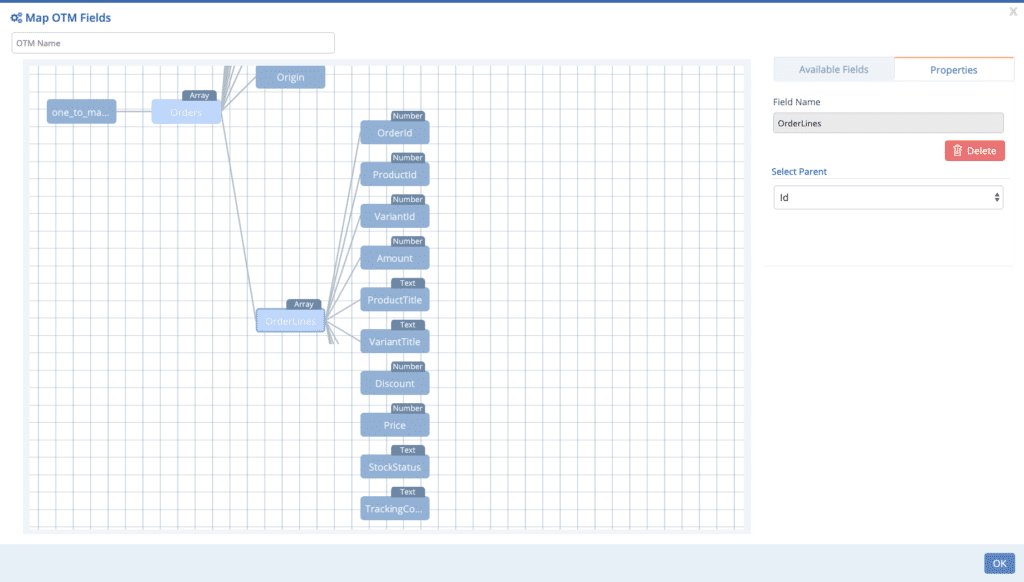
- “OrderLines” needs a relationship (parent). Go to the “Properties” tab in the top right and set “parent” to “Id”
-
- A new structure needs to be built from “OrderLines”. Mark/click on “OrderLines” to activate it. From here, you need to drag over the following fields: OrderID, ProductID, VariantID, Amount, ProductTitle, VariantTitle, Discount, Price, StockStatus, TrackingCode
-
- Click “OK” in the bottom right-hand corner.
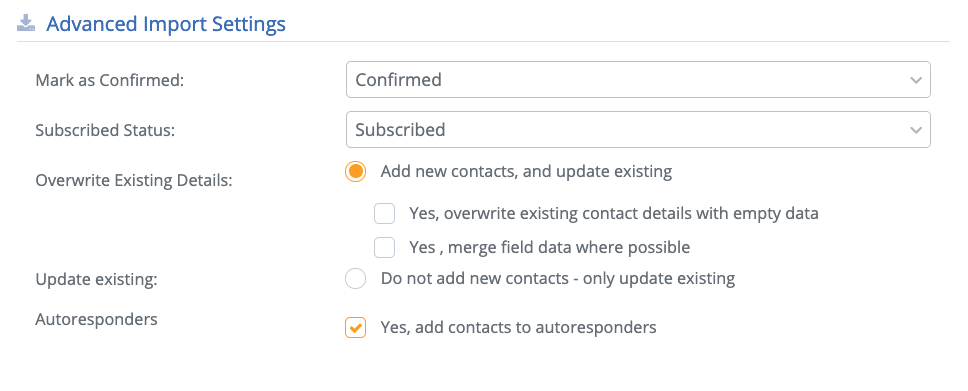
- You should now go to “Advanced Import Settings”.
- Marked as ‘Confirmed’ must stay as “Confirmed”.
- Subscribed Status must stay “Subscribed”.
- In “Overwrite Existing Details” select “Add new contacts, and update existing”. The rest should not be selected.
- In “Autoresponders” select “Yes, add contacts to autoresponders” if you have set up Autoresponders in the system.
- In “Filter content where”
- Select “Match any rule (OR condition)”
- In the dropdown menu “The webservice items in this connector will be filtered by this rule” select “Newsletter”. Here, respectively, “Bool” and “True” need to be selected. This means that we will only retrieve the contacts where there is permission to do so.
- Save and close.
You have now set up your SmartWeb Connector.