Split-test is an automatic way of making sure that your Contacts receive the best performing email Campaign as possible. With Split-test it is possible to send a number of different versions of your Campaign with small differences such as text, images, subject-line etc. to a small portion of your Contact List, find the best performing Campaign, and send that to the rest of your Contact List.
Before we go to the tutorial setup, we need to get a few basic principles in place.
The setup will guide you through these options:
What can you test?
- Email Campaign
- Subject Line
- From Name
What can determine the winner?
- Open Rate
- Click-to-Open-Rate
- Click-Through-Rate
How big should the test pools be?
When should the tests and the winner be send?
Let us begin our setup tutorial.
Create your split-test

When you reach the Split-test page – you will first notice that it is looking a lot like the view of Triggers, Flows, Autoresponders, 2Way SMS. That is because it is indeed the same view.
Here you will have to select a Contacts List, you can see your current Split-tests and their status, you can edit them and much much more. This part of it will be described in the end of this document. On the image above you can see I have already clicked ‘Create Split-test’ and have named my Split-Test. Lets go ahead and click Next and dig right into creating our very first Split-test.
What can you test – Split test type
On the left of this image you see the three things we in the first version can split-test
- Email Content
- Subject Line
- From Name
On the right side you will select your choices of Campaigns, subject lines and from names.
Email Content

When you select Email Content you can select up to 5 Email Campaigns. There is nothing more to do for now.
Email Content is great to test if the client is in doubt whether their Christmas Campaign should start with an image of Santa Clause, a snowman or Elsa from Frozen. It could also be certain products in certain positions, headlines, button placements or any other thing inside the Email Content itself.
NOTE: In order to prevent you from making a mistake you can only choose Campaigns that are tied to the same Contact List or Segment for which you are creating your Split-test. If you can not find a Campaign you will most likely have to go back to your Campaign and edit the recipients to include the right Contact List or Segment
Subject Line
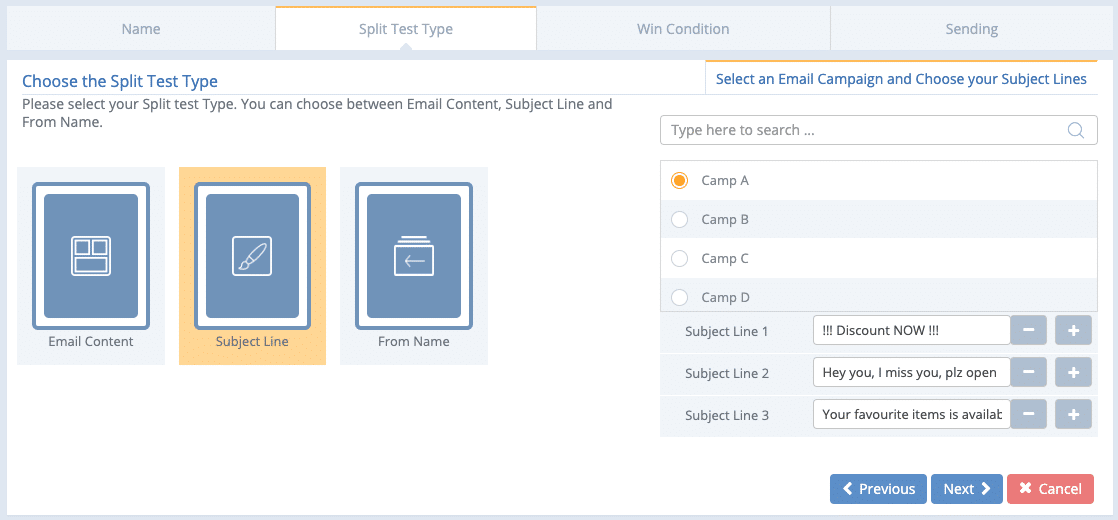
When testing the Subject Line you are allowed to select a single Campaign and input up to 5 Subject Lines for testing.
Why test the Subject Line? Well, the Subject Line is one of the absolute key elements for making a Contact open an email Campaign. Things such as writing free, dear first name, write a sense of urgency with ‘few left in stock’ or ‘only this monday’ etc play a huge part in how many Contacts are opening the Email Campaign.
Read more here: https://mailshake.com/blog/subject-line-ab-tests/
From Name
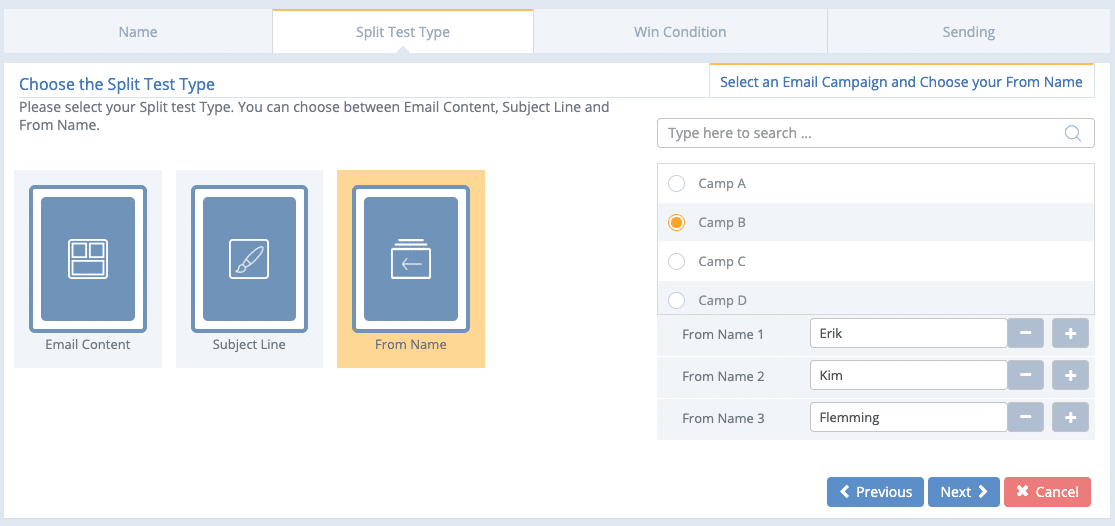
From name is looking a lot like Subject Line. Why test a From Name? Well in this scenario we will figure out whose name will get the most sign-ups for the next Webinar!
Lets go ahead and click ‘Next’.
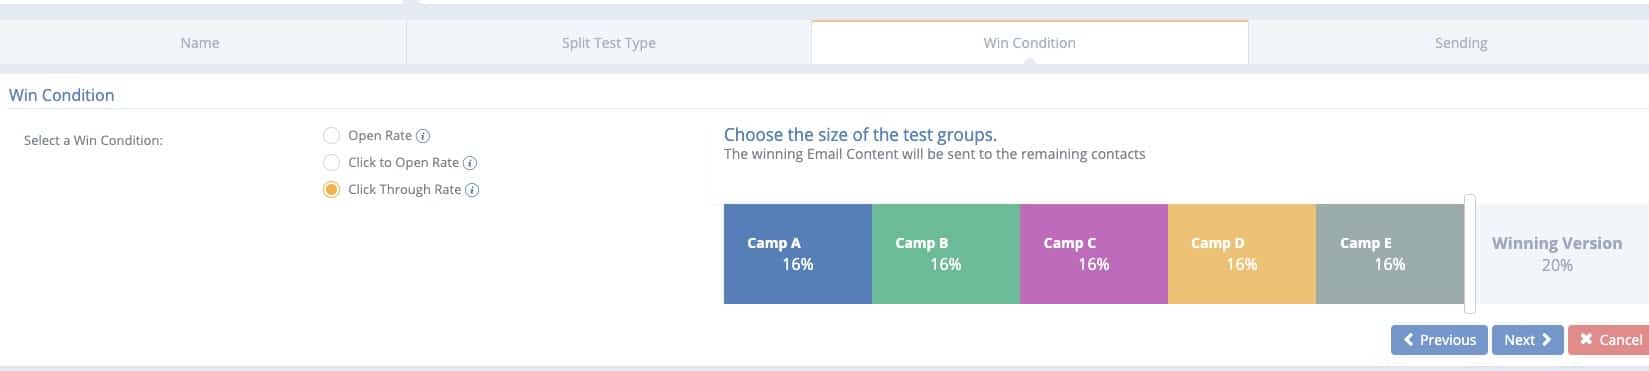
Win condition – and size of test groups
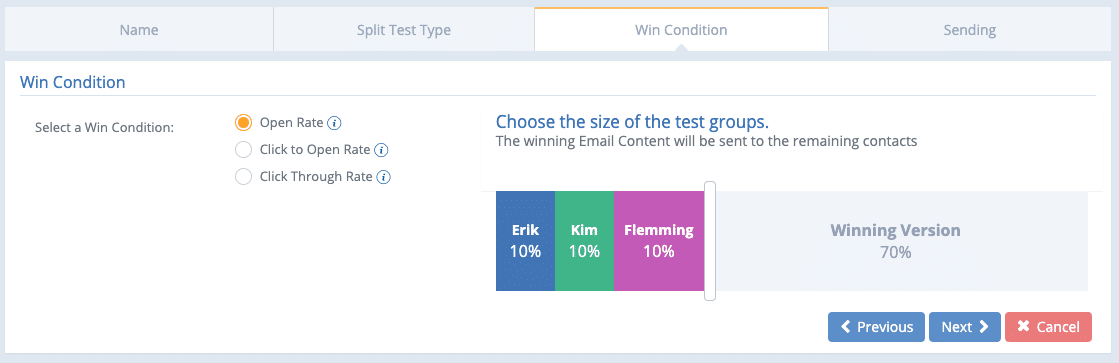
It is finally time to play with the slider. But first, we need to get a bit technical.
You need to select a Win Condition, but which rule should you choose?
Well… it depends. What does it depend on? It depends on what you are testing.
If you are testing a Subject Line that I just told you heavily impacts how many Contacts who are going to open you Email Campaign – it makes sense to let the Open Rate determine the winner.
What does Open Rate, Click to Open Rate, and Click Through Rate actually mean?
We have added small information-icons with the following text. Please see the following snapshot from our documentation:
- Open Rate [radio button]; is selected by default if Subject Line/From Name Type is chosen the previous step
- Click to Open Rate [radio button] ; is selected by default if Email Content Type is chosen the previous step. Is measured by how many of the openers of your Campaign has clicked a link in the Campaign. This is a great way of testing the Email Content itself.
- Click Through Rate [radio button] Is the ratio of clicks in the Campaigns. The Clickthrough rate is measured by a number of factors such as: link-elements, sending time, open rate. This is a great all-around way of testing the effectiveness of your Email Campaign.
So Open-Rate (OR) measures the effectiveness of the factors BEFORE the Contact has read the email such as: subject line, from name, send-time etc.
Click to Open Rate (CTOR) measures the effectiveness of the Content itself while eliminating the opening-factors such as subject line etc.
Click-through-rate (CTR) is the general overall indicator for how your Email Campaign sendout is performing as a total.
Important! – avoid the CTR trap
While it is easy to just select CTR since it is the alpha-omega number, it is impossible to know whether a good or bad CTR is because of the content, subject line, send time, from name, weather, traffic or whether or not the contact ate breakfast that day. That is why open-rate and click-to-open-rate have validity as options along with CTR, as they are best for learning about your contacts.
Size of testing groups
You can drag and drop the slider to decide the size of the test groups as much as you want.
The test group sizes, at least in the first version, will be the same size, and shown in percentages.
Sending and saving the Split-test
Let us split this image and go bit by bit.
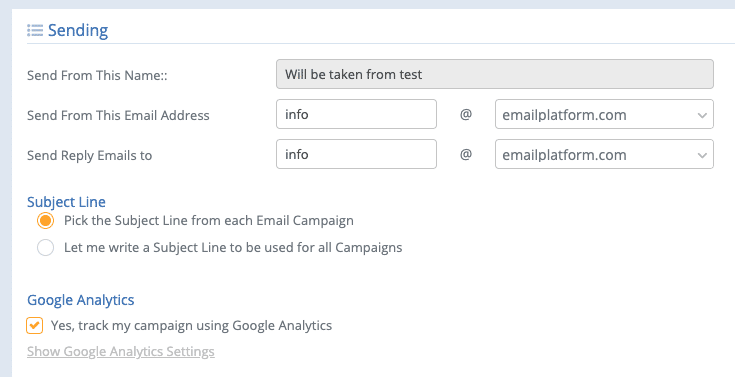
Send From Name and Subject Line will differ a bit depending on the Test type you have chosen.
Test Type is From Name
-
-
- You cannot choose the From Name here – since it will be determined by the test
- You can choose to pick the Subject Line from the Campaign – or write one here that will overrule the one written when creating the Campaign
-
Test type is Subject Line
-
-
- You can write the From Name here
- You cannot write a Subject Line – since it will be determined by the test
-
Test type is Email Content
-
-
- You can write the From Name here
- You can choose to pick the Subject Line from each Campaign, or write one here that will overrule the ones written on each Campaign.
-
Google Analytics is as you know it.
Let us specify when we want to send the Split-Test
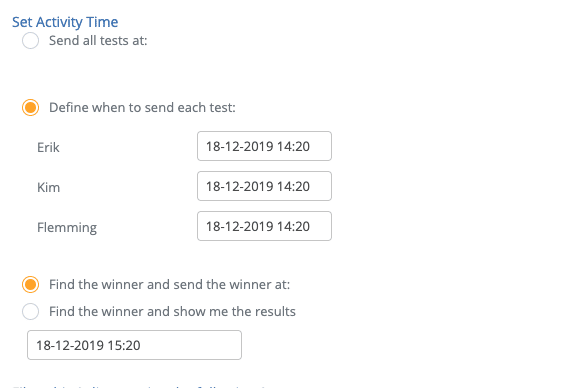
As default we are suggesting to send all tests at the same time. But you can choose, as I have chosen here, to send each test at a different time. This can be used to your advantage and disadvantage. You can test several Email Campaigns where only the sending-time is different – and actually test when it is the best time to send your Campaigns.
However if you are testing Subject Lines and they are all sent on different times – you will not know if it is the time or the Subject Line that is causing the difference in performance.
You can also combine it to test 2 Subject Lines on 4 different times like this:
Subject Line 1 – sending at 9 am
Subject Line 1 – sending at 4 pm
Subject Line 2 – sending at 9 am
Subject Line 2 – sending at 4 pm
Send the winner automatically or not
The test will end on the chosen date here:
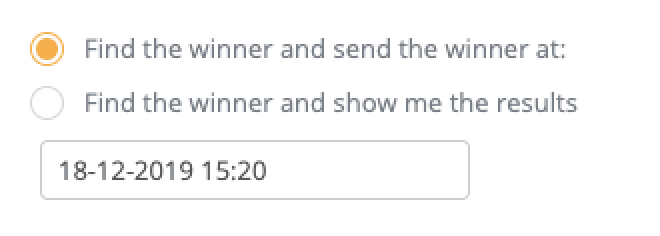
When the Split-test ends on the chosen date, you can choose to send the winner automatically to the rest of your Contacts, or get a summary email and decide whether or not and when you want to send the winner.
If you choose “Find the winner and show me the results” you will receive a campaign looking like this one:
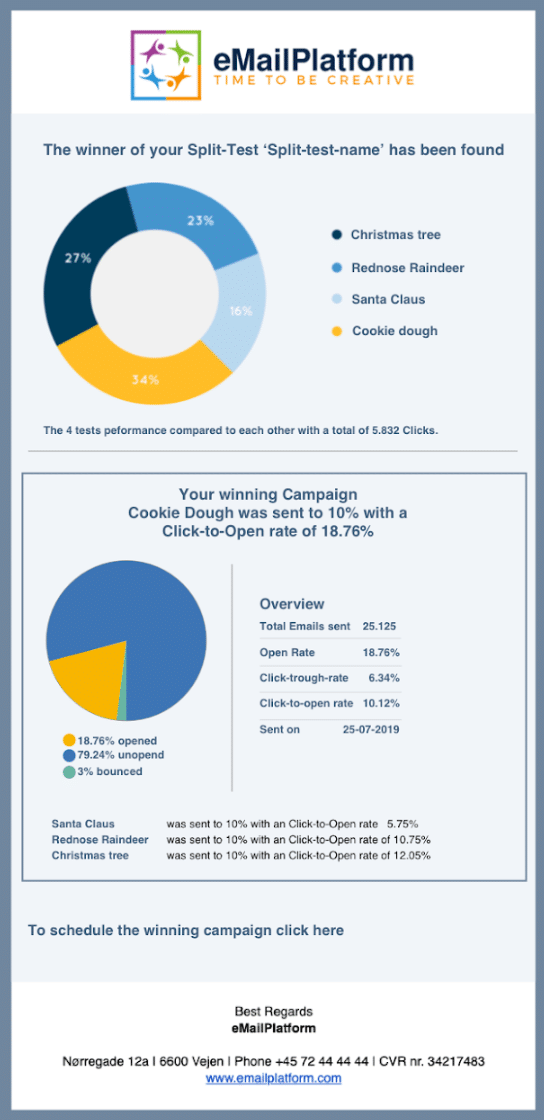
This summary email will show you how your Split-test groups performed and showing you the winner.
Overview and status
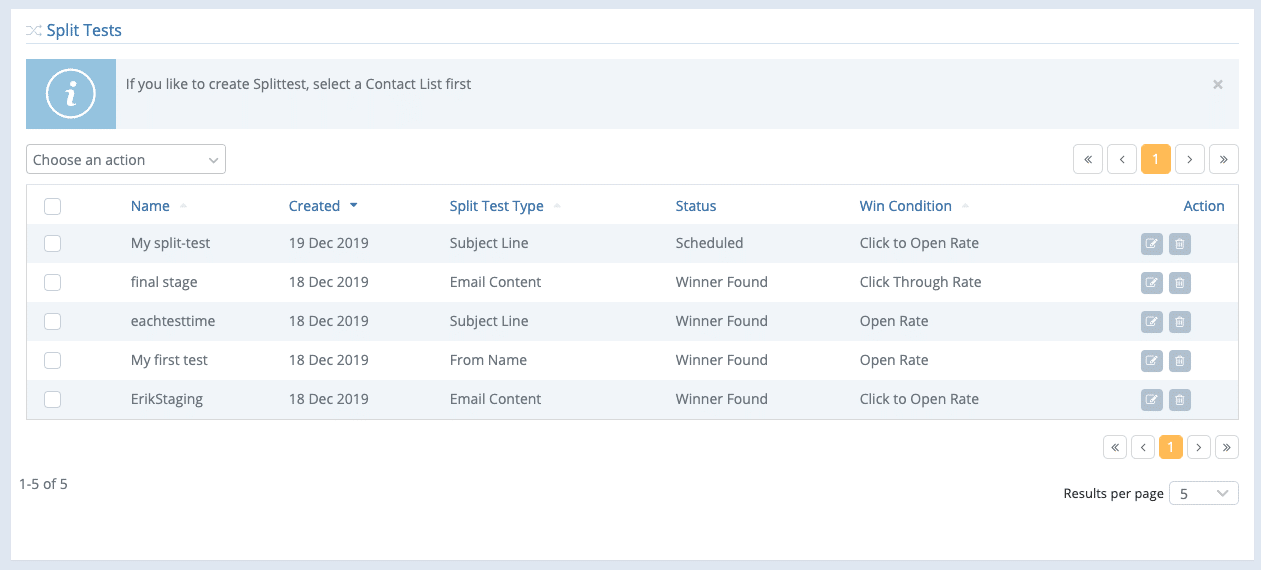
When you go to View Split-test you can see an overview over your existing Split-tests. You can filter by Contact List or Segment to the left. You can see the Name, created date, type, status, win condition and you can edit or delete your Split-test.
What are the different statuses?
-
-
- Scheduled (activated but a test not yet sent because it is scheduled in the future)
- In progress (tests are sending and test-period in progress)
- Winner found (winner found when tests are done, but the winner is not yet sent)
- Sending winner
- Done
-
Statistics
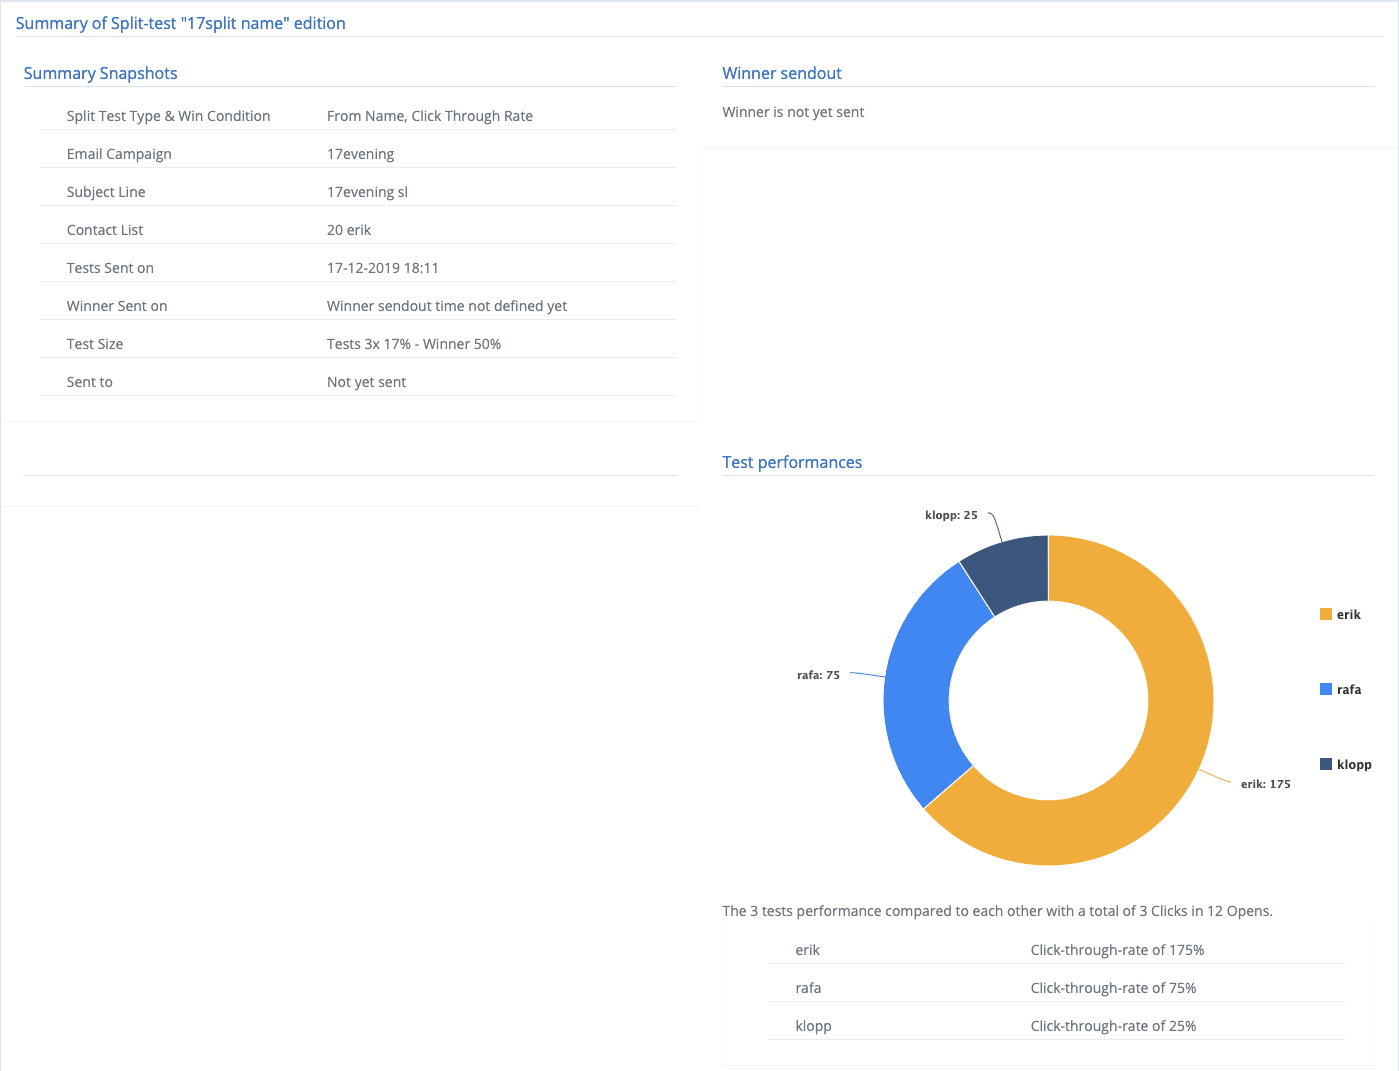
The statistics will offer some insights into how the tests have performed, while still inheriting a lot of the quirks from our current statistics in general.
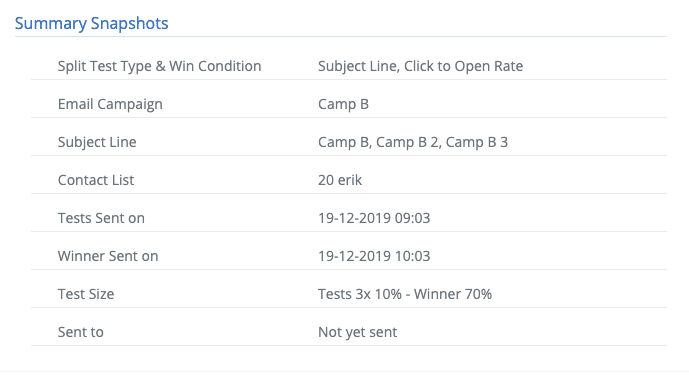
In the top left you see a Summary Snapshot of the ‘formalities’ such as sent time etc.
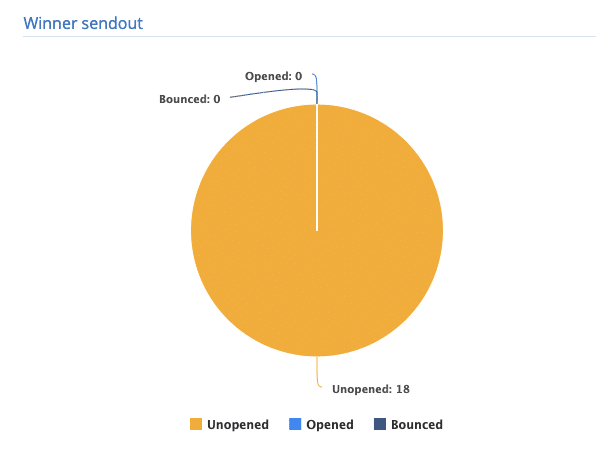
In the top right you will see a snapshot of the openings of the winner sendout – unless the winner has not been sent yet.
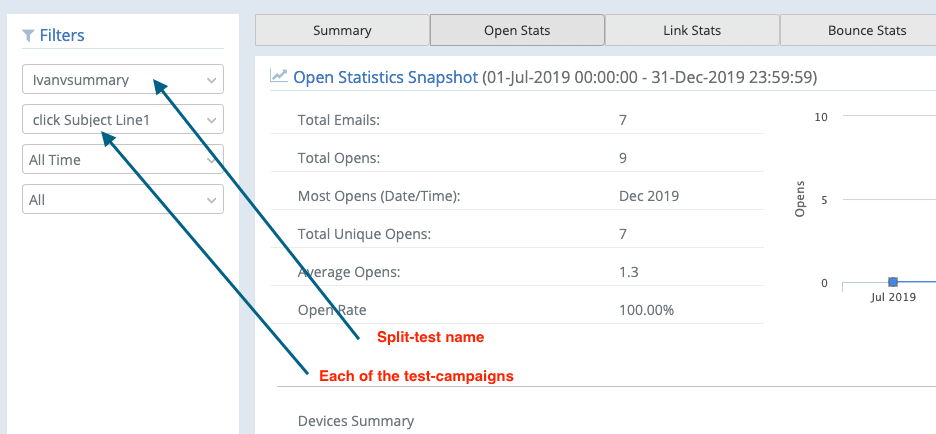
If you want to see how each test has performed – click any tab, and you can select a specific test here to the left. The statistics will be as you know them from normal campaign sendouts.